Monday, August 31, 2009

Angles & Framing

When it comes to framing and angles ...
You shim it up with anything that is handy.
In this case it was a couple of 5 gallon buckets
and some wood scraps ...
as long long as the parts all match up ...

I sure hope I got this angle correct ...
because it is all welded up now and I'd hate to have to cut it apart. I sure wish I made lovely welds like Jack or Brad ... but I don't. Which is a good reason for me to own
a 4-1/2" hand grinder!

Hey, this angle looks pretty good!
One out of three isn't too bad ... :-)

Sunday, August 30, 2009

Fork & Wheel

Here's where I'm at now.

I probably should have made the fork a bit wider at the top ... if this wheel ever warps, that nylon drive-ring will be hitting the fork. Maybe I can scrounge up some more 1.25" square tubing and make another fork ... and another pair of dropouts.

My intention is that I will mount that GEBE 32cc Tanaka engine on the rear wheel ... wait, I think I told you this already ...

Okay, well there it is ... clamped to the work bench.
by-the-way ... it's upside down at the moment.

Friday, August 28, 2009

Not much today

I didn't get as much done today ...
There was walk-the-dog, check email, answer email (respond to another one of those bogus Koran 9:11 things ... whatever is being claimed it says ... it doesn't), check tinyhouseblog, send another email, breakfast, a little work in the shop, then a meeting to attend, some groceries to shop for (Pork Spare Ribs for $1.09 a lb. !!), a daughter to visit and split the ribs with, paid off the guy who isn't getting back the bicycle that I chopped up for parts (like I said, all other projects are taking 2nd priority), back home and about to go in the shop when my neighbor says lets go to the big city and buy fasteners, cutting wheels, and visit Harbor Freight. That blew the time until 7 p.m. when I made it back to the house.

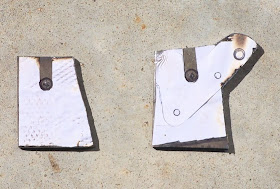
Anyway ... I was making dropouts ... took them outside to photograph ... and had a visitor who wanted in on the picture ...

So, here they are ... incomplete.
You may notice one little oddity ... the thing sticking out of the top side of the one on the right ... Thats so that I can attach one of those screw-in derailleurs. Don't believe me? Just wait and see. Tomorrow is another day ...

Thursday, August 27, 2009

Warrior Trike - Other Things on Hold


AtomicZombie has just released the plans for the
Warrior Racing Trike
http://www.atomiczombie.com
I want to build one!!!
I already have enough square tubing for it.

Construction process for the rear forks ...
I deviated from the original plans ...
they called for square tubing all the way to the end
With just a 45 degree cut/taper.

After reading the plans completely thru one time. I knew that what was intended for the rear dropouts wasn't going to work for me. I needed to make thin sections at each end so that my GEBE 32cc Tanaka engine could mount to the rear axle. I also had to bend them slightly so that they would have a straight even area to attach the dropouts and rear wheel. I clamped them on either side of a 5-1/4" wood block for the wheel spacing.


The plans called for 1-1/2" tubing ...
Which I considered major overkill. Besides I had some 1-1/4" tubing left over from the DeltaWolf trike I built ... So I made the rear forks out of the smaller tubing. And since I used up all the smaller tubing, I'll make the rest of the frame out of the larger tubing.

So this is what I accomplished today.
All the ends are capped and the welds have been ground ... sort of smooth ...
Tomorrow is dropouts and the seat tube.
I'm considering changes to the dropouts to work with screw-in rear derailleurs.
One of the rear pieces is slightly thicker than the other ... I discovered that it worked just fine if I welded a 3/16" plate piece that was 3" long, and the width of the tubing. I cut away all but the inside wall of the tubing ... welded the plate onto the inside of that wall past the point of the slant. Then welded the slant cap on. The thicker one was the first one and I over-laid the plate with a tubing cap. NOT! Only cap the 45 degree slant after welding the plate in. It will be more than sturdy enough.

Saturday, August 22, 2009

How to burn time ...

I spent hours removing the car, cracked concrete,
and other clutter from the background of this
and several other fotos.

I received them from Jack ...
and when I am completely done with them,
they will appear on the S&B Recumbents website.
http://home.pacbell.net/recumbnt

This tadpole trike with the Over Seat Steering stick
is called the L.A. Lowrider

Sunday, August 16, 2009

Doing Repairs

This kind of got trashed by the boys ...
No one specifically admits to it ... that kind of story.
And their Dad couldn't repair it ...
So, it was sent back to Gpa on a permanent basis.

And I'm working on it and riding it a bit ...
and working on it some more.
As long as I keep my elbows out of the rear tires ...
I'm doing okay. :-)

Friday, August 7, 2009

Seat Support Rods

I bought these at the big-box store ...
Try Lowes, Home Depot, TSC ...
They are aluminum -- 1/2" tubing & 3/8" rod.
used for the upper seat support.

The rod slides into the tube ... buy 2 tubes and 1 rod.
You will have to adjust these for length ...
One end of each tube is mashed down (use hammer & vise) to become a flat surface thru which you drill the hole for the bolt to attach it to the dropout. Use an 8-10" length of rod for each side ... mash down one end of each rod (use a BIG hammer and many hits ... ) The rods are attached to the upper seat support bar bracket (those things you welded on the bracket that poke down ...)
see brackets in the previous post below ...

Up near the top of each tube, drill a single hole. Mark your rod with 1" lines (use Sharpie permanent marker) ... slide rod into tube until line is visible thru hole and drill a hole through the rod
(large enough to accept a small/medium "hitch pin")
It helps if the rod is attached to the bracket & seat when you do this ... so it doesn't rotate on you ... (same same with the tubing - attached to dropout).

This part isn't explained really well in some instructions.
Anyway, it makes it adjustable for a more comfortable ride (no you don't want the seat to be vertical) ... you do want the seat leaning back somewhat ...

Tuesday, August 4, 2009

Seat Brackets

Some people have had questions
about attaching their seat to their main tube.
Here are some ideas ...

Turn your head 90 degrees to the right if you have a hard time visualizing this ...
This is a bottom seat bracket to go on a round main tube.
The section to the right was made from 2 pieces of 3/4" EMT tubing ... or just one piece cut in half. The wall thickness is too thin otherwise.

I adjusted one piece to fit snuggly to the other ... then adjusted the whole thing to fit around the seat tube.
Tack welded the 2 EMT pieces together.
"Adjust" = use hammer to tap it around another tube or rod used as a mandrel to spread it slightly.

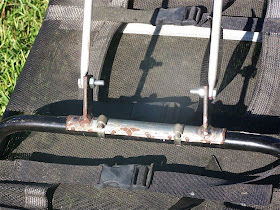
Here's a support bracket for the upper back of seat ...
It's upside down ... because the seat is laying on the ground.
You think the photographer could have taken the foto the other way around ...
bracket was made using the same "adjusting" technique.

Just to be consistent in upside-down fotos ...
This bracket was made by tack welding a "U" bracket
to a piece of tubing.