Tuesday, July 7, 2009

More Fixes

V-brakes won't work normally on the front fork due to cable routing conflicting with the chain. So I mounted the caliper brakes and will have to remove the posts.

This is a sideview of the front derailleur.

Since the seat was too close to the steering stem ...
This was my solution ... a tilting stem ...
So you can get in and out of the seat.

What I am attempting to show you here is that I had to install a shorter length axle (or whatever you call the shaft that passes thru the middle of the Bottom Bracket). The original shaft pushed the crank gears too far out so that the largest one couldn't be reached by the front derailleur mechanism.
Now it works fine.

Friday, May 22, 2009

Further Along, but ...

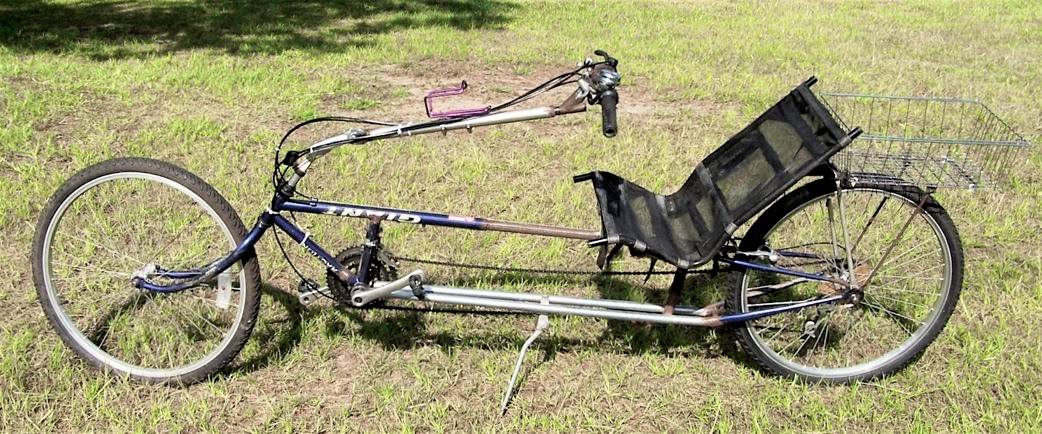
There it is with a mesh seat cover, rear derailleur, and crank & pedals on the front.  Almost looking like a real recumbent.  

The new owner has a 28-inch inseam ... which places the seat up very close to the steering stem.  AND, he wants the seat almost vertical.  It is tilted back just barely enough for the chain line to clear the bottom of the seat fabric.  HOWEVER, I can just barely squeeze in between the seat and the steering stem.  And getting back out (getting the bike to drop down off me) is very difficult ... it would almost be easier to flop over sideways onto the ground and crawl out (OUCH!).  
SO, I have to do something about making a tilting steering mechanism.

Here is the rear derailleur attached to the dropout.
There are two other smaller holes that I had to tap threads into for use of the seat stays and a possible future rear rack or Golden Eagle gasoline engine.

Here's looking at the threaded holes from the inside of the frame.

Rear Derailleur Tap

The Big Box stores around here don't have taps.  

You need a tap to cut the threads in the 8.5mm hole that the rear derailleur threads into.  It is a 10mm tap ... however, not just any 10mm tap will do.  The upper tap in the foto is 10mm x 1.5mm (I didn't know what the thread count on it was since it isn't marked, so I tried it on a piece of scrap metal ... too course for the derailleur threads).  At this point I searched the internet and on Sheldon Brown's site it specified that the tap had to be 10mm x 1.0mm.  I went to the nearest BIG city (I live in a tiny town with cows) ... where I found an industrial hardware store ... that just happened to have the bottom tap in stock (this saved me about $6 difference from the cost of buying it and having it shipped from Amazon.com).

The new tap worked absolutely fine.  I tapped the hole in the dropout and attached the derailleur.

More About Steering

The seat tube clamp is not attached in any way to the tubing.  I did cut 4 slots in the tubing so it could be clamped down tight on the stem that you see below.  You have to tighten the bolt really tight to keep the tube from wiggling back-and-forth on the stem.

Once upon a time ... there was an angled section attached to the side of the stem ... which went forth and clamped to the handlebar.  I cut that off with a hacksaw and ground it smooth.  I inserted this like normal into the headset, tightened it really tight (doesn't matter which direction this faces ... only you will know what's under the tubing), then slide the tubing down over the stem top to the headset nuts, and clamp it (making sure the handlebar is perpendicular to the wheel).

Friday, May 8, 2009

The Skeleton stands

Needs: Seat Cover, crank & pedals, chain, and cables.

I've been slow at figuring these things out ... so have procrastinated.
Read a book the other day about First-Borns and found there was a type like that ... it's always great to have an excuse ... altho they called it "frustrated perfectionist" ... frustrated yes. perfectionist ... are you kidding me?

Steering stem attachment.
a length of seat tube off a small bike that would clamp around the neck thing that usually holds handlebars ... maybe I should include more fotos and explanation. I had less than that to go on with the Bentech plans.

side view

welded posts and attached V-brake.
(20" front fork - thrift store bike)

Didn't have enough posts to weld on the rear ones too
so I simply cut this off a front fork and welded it on in one piece.

It has to go underneath due to chain routing issues.

view down the length -- it's straight!

Wednesday, May 6, 2009

Old Bike in the Jungle


This is an old bicycle frame that I found in the overgrown jungle out behind an abandoned house here in town. Considering what has happened to the front fork ... I'm not sure that the bike is even restorable.

I'm still hacking away (every so often) on the recumbent SWB that I'm building for some guy ...

I offered to give him back his parts bicycle and forget the whole thing ... but he refused.

So whining and screaming, I periodically drag myself up to the shop and work on it some more.

Today I scrounged up some posts and welded them on to use a V-brake on the front wheel. I had mounted a caliper brake ... but didn't feel comfortable about it's stopping power ... particularly if he decides to mount a motor on this bike (he really wants a motor like mine on his recumbent too). I already had mounted a V-brake setup on the rear wheel. Dang! I think the cable with a few parts I need to use on the V-brake -- just fell down behind my work bench ... I'll have to dig it out tomorrow.

After reading the sparse instructions about steering in the BenTech construction plans ... I dug thru my scrap pile and found a tube to use as an extender between the headset and the handlebars. I slapped a set of bars into place and it almost looks like you can steer it.

Then I started working on the seat stays that run from the back of the seat to the rear dropout. The only problem is that the seat doesn't have a cover. I think I'll take the cover off my good web seat and put it on this bike. Then I'll have to talk someone with a heavy-duty upholstery sewing machine into sewing up another cover for my seat (once I buy some more of that Phifertex fabric).

I'll take fotos of all of this and post them tomorrow.

Saturday, April 11, 2009

Procrastination -- and Frame Problems

There was a problem with the frame ...
When you clamped the bare frame in the jig and looked at it straight on from the front to the rear, it looked like the front end and bottom bracket were twisted to one side.
The rear forks were SOLIDLY welded into place, so what could I do about it? I thought about it, and thought about it. Kind of a slow thinker. And PROCRASTINATED, because I was so upset with the frame. Finally I cut a piece of stock main tubing about 2" long. Clamped it sideways in the vise and started cutting strips out of the length ... creating quite a gap ... until it would squeeze tightly together and just barely slide into a piece of main tubing stock.
Then I took my hacksaw and cut perpendicular across the main tube of the frame about 3" up from the rear forks. Using a round file, I filed in little half-round chunks out of the edge of the main tube. Slid the insert into the main tube and tack welded it into place. Then I slid the insert into the rear section ... put it in the jig ... and made sure the entire frame flowed straightly from front to back ... before finishing welding it all back together.

Now it is straight.
I feel so much better about it !! Now I can finish it!
with No major structural flaw.
Just small things and the steering before I get
it powder coated.