Yesterday was a great day for bicycle parts collection. Someone put 2 bicycles out by the road with a sign saying "free bikes" ... so I took them home. It seems that one of them just needs some air in the tires ... and a rider. Then later in the day I was passing by bulk garbage piles and saw a bicycle wheel. So I stopped and found 2 more bicycles that I put in the car and took home. Now the question is, do I just fix them up and give them away? Or strip them for parts? (cut up the frames, save the brakes & shifters, etc.)
I'll worry about that later. I have other activities to attend to today. Gotta go! :-)
Friday, June 22, 2012
Sunday, June 3, 2012
Mach3 - Change the Front Wheel
I changed the front wheel to a 24" one (had to cut the brakes assembly off to do this and patch the fork and grind things smooth again) ... and rode it around. Pretty nice. Then I changed it to a 26" wheel (the brake assembly was still off). It rides pretty good and is the same size as the rear wheel. Which means you can theoretically make it from just one donor bike.
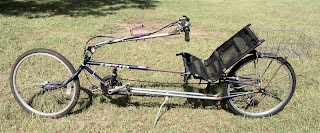


sideview with the 26" wheel

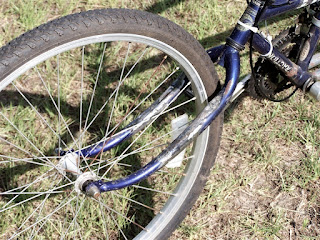
Brakes removed

sideview of the front fork
Wheel clearance of front fork ...
too close for caliper brakes,
awkward even with "V" brakes

Another view of fork clearance

This view shows the roller for the return chain.
It keeps the chain from swinging back and forth and wreaking havoc. I had to drop it down a little so that the chain didn't rub the bottom of the frame when on the big gear in the back and the big gear in the front at the same time.
Thursday, May 31, 2012
Blue Mach2 with Rack
Okay ... I like how it rides so far. However, I had no way of carrying anything with me. So, I added a water bottle holder on the steering tube. Then I custom made a rack for the back from an oven rack. And attached a refrigerator basket to it with cable ties. Also put some clip-on pedals on it. I think I may change the front wheel to a 24" one ... which will give my pedals more ground clearance. (meaning I won't occasionally scrub my heels on the ground)


The custom rack made from the oven rack

basket attached to rack with cable ties

side-view of the whole bike
Saturday, May 26, 2012
I finally attached the long cables to the rear and now have dual brakes and a wide range of gears. I had to re-work the welds on the steering bar. And I admit that I probably bent the front forks too much ... it sits just a little bit low to the ground ... I know this because my heels occasionally scuff the ground. It is quiet, rides nice, and I'm just going to be happy with it as it is. Too many problems to change it now (I'd have to re-work a whole new front fork). I'll be aware of that on my next bike. In the meantime, I'm riding this bike almost every day. I'm willing to take on hills and longer mileage. The goal this summer is to work up to 30 to 50 miles a day.
UPDATE: You'll find that I later re-worked the front fork ...
UPDATE: You'll find that I later re-worked the front fork ...
Tuesday, December 27, 2011
Mach2 in Blue
Once upon a time at D.I. in St. George, I bought a "Giant" mt bicycle. Eventually I cut it up and welded it into a Mach2 frame. A.D. Carson's Mach2 Instructions
And then it hung on the wall in the shop for a long time. So, the other day I decided to cut apart the rear end of my TE Clone and straighten the angle of the rear wheel. Which means I needed to pull down the Mach2 and throw it together so I have a LWB recumbent to ride. Anyway, at the moment I scrounged up enough long cable to connect the front brake and the front derailleur ... still need some really long ones for the rear. That means I only have a 3 speed (the one tiny one on the rear, varied by the 3 crank rings on the front.) It's not really up to hill climbing yet. But I'm having a great time racing around town on it. Foto follows:

And then it hung on the wall in the shop for a long time. So, the other day I decided to cut apart the rear end of my TE Clone and straighten the angle of the rear wheel. Which means I needed to pull down the Mach2 and throw it together so I have a LWB recumbent to ride. Anyway, at the moment I scrounged up enough long cable to connect the front brake and the front derailleur ... still need some really long ones for the rear. That means I only have a 3 speed (the one tiny one on the rear, varied by the 3 crank rings on the front.) It's not really up to hill climbing yet. But I'm having a great time racing around town on it. Foto follows:

It has a sticker on it from when it was registered in SLC onetime.
(Just back of the upside down word "Giant".)
Tuesday, September 6, 2011
Cargo Bay

I put in 1/2" EMT support bars in the cargo bay area
to provide more even support under the thin plywood decking that I intend to attach in this area.

In conjunction with all the tubing underneath,
This area should support a fair amount of weight.
If the wheels can support it, that is.
I've placed my entire 250 lbs standing vertically on this area and the only sag I noticed was in the front shocks and front wheel.

Here's what it looks like at this point. Next step is the steering.
Saturday, August 6, 2011
Freighter Cart 2

The materials list and information here is nice to have.

This is the really important part ...
making the bends.
Using this information from page 150 you can make any number of different carts. The axle plates are made with plain electrical box covers that have no punch-outs, and have corner slots for screws (which in the diagram have been cut off). If you need more information about the axle plates, click on the link to axles or freighter cart plans and it will take you to that blog entry.


Subscribe to:
Posts (Atom)


