Sunday, July 17, 2011

The Cart Book With Plans & Projects - Freighter Cart


 I bought the hardbound edition of this book back around 1983 when it was published.  Like so many good books, it is long out of print.  I scanned the pages talking about how to make the Freighter bike cart and have them in a PDF.  This is a really great cart.  I think the Bicycle Touring Cart is also a very handy cart as well.  I've made one of those too, but my cousin has it now, so I need to make myself another one.

Friday, July 15, 2011

More Like a Cargo-Trike ?

No box or steering bar yet, but it is starting to look like something.
Right-side view 

Box goes up front between the wheels. 

frontal view 

left-side view 

This is an example of how it works when finished. 

Another example of a finished one .. in use.

Thursday, July 14, 2011

Wheels?

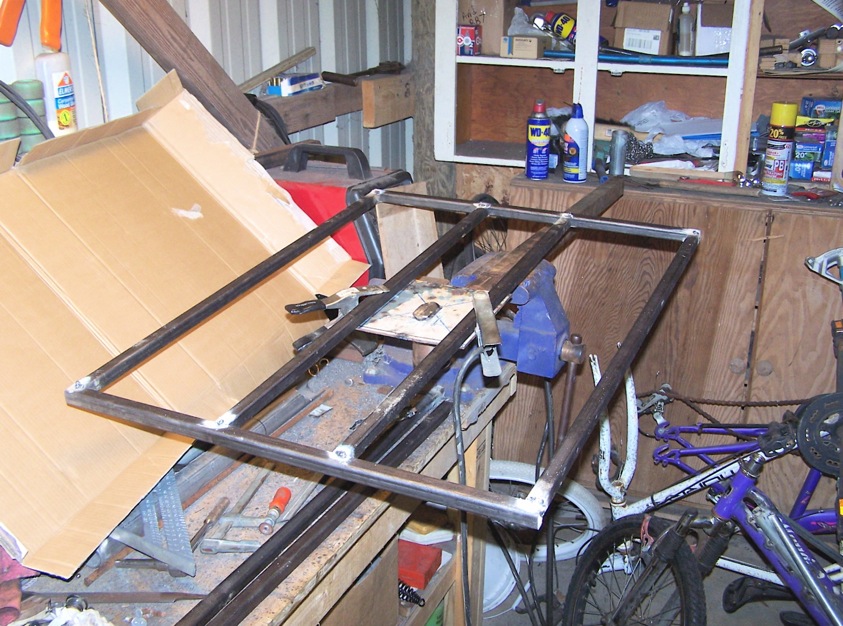
This needs explanation:  
I used flat electrical panel plates to make the parts that support the wheel axles.  2 of the plates I took and inch off the top.  The other two plates I drew a line across one (1) inch from the top.  I placed these plates in the vise with the line even along the top of the front jaw, with a piece of 3/4" round tubing clamped behind it.  Then I used a hammer to wrap the top of the plate back around the tubing.  Those are like the one you see clamped around the tubing closest to you.  The straight ones are clamped to the cargobox square tubing.  At 1-5/8" in from the bottom edge, and centered side-to-side, I drilled a 3/8" hole, then used a hacksaw to cut a 3/8" slot from the edge to the hole.  Then I placed a piece of 1/4" angle Aluminum (just a handly piece of scrap) to line all these up as I clamped them for welding.  These aren't centered on the sides, but located just aft of the pivot point.  Why?  I don't know.  Just because most of the cargotrike frames I have looked at, had it that way.   

Here it is with the plates welded on to hold the axles. 
Notice the 3/8" slot cut  down to the drilled hole.

Here it is with 24" wheels 

Looking at the bottom with 24" wheels on.
The rope is because I was trying  drag it to the house to show my wife, and it just kept pivoting back and forth.  So, I had to lock it down with the rope in order to tow it behind me.  It will be okay once I weld the aft portion of the bike to the main tube and attach some kind of steering bar to the cargobox frame.

Wednesday, July 13, 2011

Needs Wheels

To the cargobox frame, I have added the outside support tubes for the wheels.  These are large enough to contain 26" wheels.  Designed for the use of front wheels only.  I marked the 3/4" tubing at 4" and 37".  I aligned the 4" mark with the arrow on the tubing bender and gave it a 45° bend.  Then I cut the tube at the 37" mark, measured back 4" and put another mark to align with the arrow in the tubing bender for the other 45° bend.  Before doing the second bend, I eye-balled the tube to make sure both bends would be in the same plane of reference.  Rotated the bent end until it lined up straight, then made the second bend.  Make sure the tube parallel to the box frame, is 4-1/8" out from the frame along the middle straight side.   Also check by laying the tubing down on the frame and supporting it with a bit of scrap to make sure the outside of the tube ends don't extend beyond the cargobox frame.  If necessary, you may want to tighten the bends a bit.  Draw extensions of your frame line and cut off the tubing at an angle for welding to the box frame.

This definitely won't roll through a door now. 

Tuesday, July 5, 2011

Base All Welded

After walking the dogs this morning, I went into the shop and welded up all connections and then used the 4-1/2" grinder to smooth them off.
 
Welded and ground smooth (well, sorta)

 
I leaned it up against the door so you can see the cargo box bottom attached to the pivot unit.

 
A closer view of the pivot unit - you can see the chainring and plate welded together and two 1/4" bolts attaching the cargobox bottom to the pivot unit.

 
Here it is, back clamped in the vise.

 
A side view across the cargobox bottom.
Next up are those outside pieces to hold the wheels ...
and then the vertical corners. 

Monday, July 4, 2011

Cargo Box Base

This frame is 62 cm wide x 100 cm long.
I clamped an end and a side to a 90° square and tacked it ...
then repeated for that side and the other end,
followed by the other side
and finally that side to the original end.
Corner-to-corner measurement comes out about the same.
Which means it is fairly rectangular ... not a parallelogram.

I measured center of each end ... then measured out 3-1/2" to either side for placement of the middle bars.  Again clamping them with the square while I tacked them into place.  I wanted them to fit just so, on the pivot plate. 

Here I've welded in cross bars the width of the pivot plate.
Kind of supports that area where the wheels will be added on the outside, and makes the middle more rigid. This was all constructed with 3/4" square tubing.  Now it needs to be ground smooth, then flipped over and welded on the other side.