Showing posts with label cargotrike. Show all posts

Friday, February 7, 2014

A Quick View of My Shop

I'm starting with my workbench and rotating 360 degrees to the right.

This is my workbench.  Drill press on the left.  Vise and mig welder on the right.  I'm using flux core wire, no gas.  On the lower shelf to the left is my 4-1/2" hand grinder.  It makes the welds look good.

Between the bench and the cabinet on the right ... mostly smaller front wheels.

Additional parts and tool storage.  I even have a bicycle maintenance book!

Here is a TE Clone (upside down), a couple of parts frames, and a stack of rear wheels.

On the left, my warrior trike frame (upside down).  A Sun SWB Speedster.  And a SWB Bentech (upside down).

Boxes of cut up parts, a wind chime, and a couple of wheels.

A cargo trike and a couple more donor bikes.  (not seen in the background is a LWB Mach3.

A Long-Tom cargo bike that still needs the steering bar to be bent and hooked up to the front wheel.

There are a few more frames hanging around, but that is about it for my current crop of "projects".

Saturday, March 9, 2013

Cargotrike Box Mounted

Here is the latest ...


Just have to add the steering module and do a few other minor tweaks.
Here's the bottom side.


and the bottom of the whole trike ...

Saturday, August 6, 2011

Scrounging Lumber

I've located scrap lumber for 1/2 the cargo box ... Now I just need to get some more 1/4" lumber to finish the box

Friday, July 15, 2011

More Like a Cargo-Trike ?

No box or steering bar yet, but it is starting to look like something.
Right-side view 

Box goes up front between the wheels. 

frontal view 

left-side view 

This is an example of how it works when finished. 

Another example of a finished one .. in use.

Thursday, July 14, 2011

Wheels?

This needs explanation:  
I used flat electrical panel plates to make the parts that support the wheel axles.  2 of the plates I took and inch off the top.  The other two plates I drew a line across one (1) inch from the top.  I placed these plates in the vise with the line even along the top of the front jaw, with a piece of 3/4" round tubing clamped behind it.  Then I used a hammer to wrap the top of the plate back around the tubing.  Those are like the one you see clamped around the tubing closest to you.  The straight ones are clamped to the cargobox square tubing.  At 1-5/8" in from the bottom edge, and centered side-to-side, I drilled a 3/8" hole, then used a hacksaw to cut a 3/8" slot from the edge to the hole.  Then I placed a piece of 1/4" angle Aluminum (just a handly piece of scrap) to line all these up as I clamped them for welding.  These aren't centered on the sides, but located just aft of the pivot point.  Why?  I don't know.  Just because most of the cargotrike frames I have looked at, had it that way.   

Here it is with the plates welded on to hold the axles. 
Notice the 3/8" slot cut  down to the drilled hole.

Here it is with 24" wheels 

Looking at the bottom with 24" wheels on.
The rope is because I was trying  drag it to the house to show my wife, and it just kept pivoting back and forth.  So, I had to lock it down with the rope in order to tow it behind me.  It will be okay once I weld the aft portion of the bike to the main tube and attach some kind of steering bar to the cargobox frame.

Wednesday, July 13, 2011

Needs Wheels

To the cargobox frame, I have added the outside support tubes for the wheels.  These are large enough to contain 26" wheels.  Designed for the use of front wheels only.  I marked the 3/4" tubing at 4" and 37".  I aligned the 4" mark with the arrow on the tubing bender and gave it a 45° bend.  Then I cut the tube at the 37" mark, measured back 4" and put another mark to align with the arrow in the tubing bender for the other 45° bend.  Before doing the second bend, I eye-balled the tube to make sure both bends would be in the same plane of reference.  Rotated the bent end until it lined up straight, then made the second bend.  Make sure the tube parallel to the box frame, is 4-1/8" out from the frame along the middle straight side.   Also check by laying the tubing down on the frame and supporting it with a bit of scrap to make sure the outside of the tube ends don't extend beyond the cargobox frame.  If necessary, you may want to tighten the bends a bit.  Draw extensions of your frame line and cut off the tubing at an angle for welding to the box frame.

This definitely won't roll through a door now. 

Tuesday, July 5, 2011

Base All Welded

After walking the dogs this morning, I went into the shop and welded up all connections and then used the 4-1/2" grinder to smooth them off.
 
Welded and ground smooth (well, sorta)

 
I leaned it up against the door so you can see the cargo box bottom attached to the pivot unit.

 
A closer view of the pivot unit - you can see the chainring and plate welded together and two 1/4" bolts attaching the cargobox bottom to the pivot unit.

 
Here it is, back clamped in the vise.

 
A side view across the cargobox bottom.
Next up are those outside pieces to hold the wheels ...
and then the vertical corners. 

Monday, July 4, 2011

Cargo Box Base

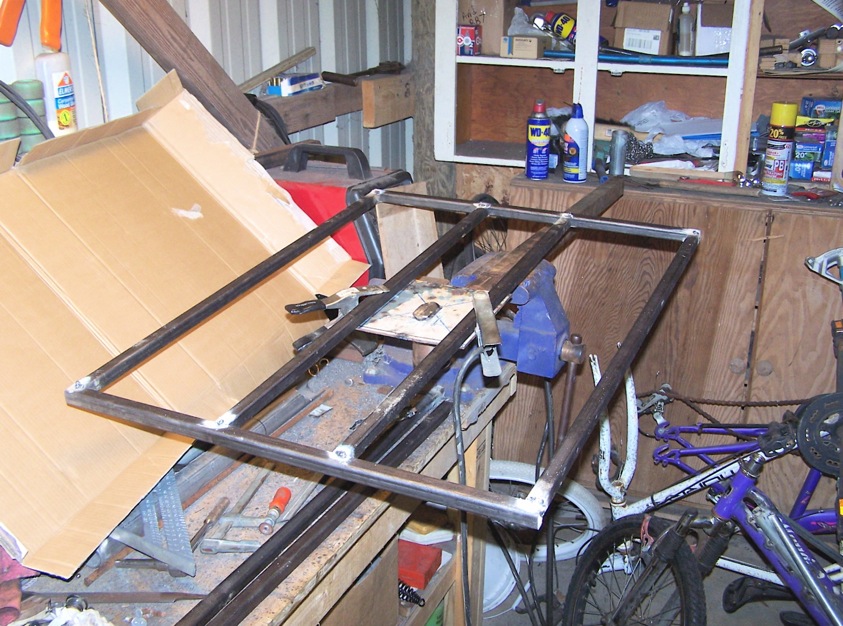
This frame is 62 cm wide x 100 cm long.
I clamped an end and a side to a 90° square and tacked it ...
then repeated for that side and the other end,
followed by the other side
and finally that side to the original end.
Corner-to-corner measurement comes out about the same.
Which means it is fairly rectangular ... not a parallelogram.

I measured center of each end ... then measured out 3-1/2" to either side for placement of the middle bars.  Again clamping them with the square while I tacked them into place.  I wanted them to fit just so, on the pivot plate. 

Here I've welded in cross bars the width of the pivot plate.
Kind of supports that area where the wheels will be added on the outside, and makes the middle more rigid. This was all constructed with 3/4" square tubing.  Now it needs to be ground smooth, then flipped over and welded on the other side.

Thursday, June 30, 2011

Cargo Trike Progress

Here's the bottom bracket welded onto the main tube to act as the box pivot.  I had to weld-in (close) a 1/2" hole left over from where a tube connected to the BB. 

This is with the pivot mechanism mounted.
You'll notice that it is not a 90° angle to the main tube.
The diagrams and fotos that I've found show it at a slight angle ... probably so that when there is weight in the box, the rear of the box doesn't drag on the main tube.  This angle on mine is the width of the Sharpie marker line (no more than 1/8" wide).  I drew the lines to make the "fish-mouth" cut outs for the BB.  After clearing out the excess metal with a 4-1/2" grinder, The BB was vertical.  Then on only one side, I ground to the back of the Sharpie line.  You have to file each side between the fish-mouth cuts to get a line that will allow the BB to seat.  And this was the resulting angle. 

The next questions is 3/4" tubing or 1" tubing for the bottom box frame? 

We'll just have to see how it all works out. 

Friday, June 17, 2011

Cargo Trike - Box Pivot

I welded a 7-1/8" square plate to the chainring - sprocket 
to give me more surface and a thicker base for attaching the box frame.
This will be inverted and the the box frame will attach to the other side of the plate you are looking at. 

The sprocket is held in place by this base of the pedal shaft.
So I kept it and cut a hole in the plate for it to poke through. 

Here the bottom bracket is disassembled.
This allows for bearings and cups to be serviced or replaced. 

I trimmed down the pedal shaft ...
So when I mount the box frame to the top of this plate,
it won't interfere with the box. 

Tuesday, December 28, 2010

Rear Section

Needing a rear section, I cut this out of a cheap mountain bike.

I think that I will use it at about this angle.
My concern is the angle of the seat tube.
Now I need tubing to make the box.

Monday, December 27, 2010

Cargotrike Plans = Cargo Trike Plans

All of the above measurements are in centimeters (cm)

The approximate inch (") measurements are: 
88 cm = 34-5/8"  (35)
127 cm = 50"
208 cm = 74"
50 cm = 19-11/19"  (20)
36 cm = 14-3/16"  (14)
62 cm = 24-7/16"  (25)
85 cm = 33-1/2"  (34)

The numbers to the right i.e. (35), are what I'd probably round the inch measurements off to.   That's what happens when you don't have a nice metric tape measure ...
Here's another view of a cargo-trike frame without the box
Of course this is a modern one with 20mm axles ...
it takes something heavy-duty like that to only support the axle on one end. 

To build one of these, the simplest would be to use a single-speed bike (donor, trash, or thriftstore) with a Bendix brake on the rear.  Cut off everything in front of the Bottom Bracket (BB) -- that's the part where the crank connecting the pedals goes through the frame.  And everything in front of the seat tube.  That leaves you with a rear triangle, seat tube, and bottom bracket all in one piece.  The cargo box and new main tube (which you will make) will connect to the front of the BB.

I decided to start on a cargo trike.  I needed something for the box out front to pivot on ... I looked at headset bearings and decided they were just too small.  So I cut a large bottom bracket off a bicycle that has a single-piece steel crank.  I cut most of the crank off on the side with the sprocket gear ... leaving just enough to hold the gear in place.  I figure to tack a thin metal plate to the single gear.  And that will then bolt to the frame of the box.  (see 6/17/11) Once I'm done welding the plate to the gear, I'll cut off the left-side crank leaving just a nub.  That should give me a good sized bearing.  And it will be serviceable ... to re-grease the bearings and change bearings & cups.

This unit will be the pivot base of the cargo box.
The box frame will bolt to the gear unit.

The steel tubing will be welded to it ...
the other end of the tubing will be welded to the BB on the rear of the bicycle.

Saturday, December 18, 2010

Christiana Cargo Trike - Other projects have had priority ...

Most bike builders do their work in the summer.  Mine has actually been moved to the winter when it is too rainy to work on outside projects.  DMV has grounded my wife for awhile, so I am considering making a cargo trike that she can ride to the local store.  Something along the lines of a Christiana trike.

I'm thinking of using a bottom bracket from a single-piece crank as the pivotal foundation for the cargo box.  And attach that to the end of of a large square tube running from the BB that the rider pedals.  Although that round handle is nice, if you had more than one-speed, how would you replace a broken twist-grip shifter?  I'll have to think about that when I get to that point.  I think I'll start with the box frame and the rear frame and see what I have to do to connect them together.  :)

Wednesday, August 27, 2008

Mexican Cargo Trikes

In SoCal, they are very inventive ... they get used or cheap Mtn Bikes and modify them for use as cargo bikes. The frame is welded up from 1/2" square tubing ... with two 26" front tires. The cargo box is welded to the front fork in 2 places and welded to the handlebars as well. They don't usually carry more than 50 - 100 lbs. (max 50 Kg).
The box sits up high for easy vending.  They vend fruits, peanuts, cotton candy and various other items throughout the Spanish neighborhoods.
I had hoped to get a foto of one of these ... and two of them showed up this morning at Jack's bikeshop. By means of a little English (one of them), a little Spanish (me), and some sign language ... I helped Jack figure out what they wanted. Basically one trike needed the rear brake pads replaced and the brake cable fixed. Maybe I should get together with my neighbors and find out what the Spanish words are for the various parts and conditions of the bicycle. That might help Jack and I in the future.