Thursday, November 26, 2009

Decided to Progress

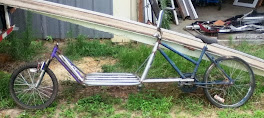
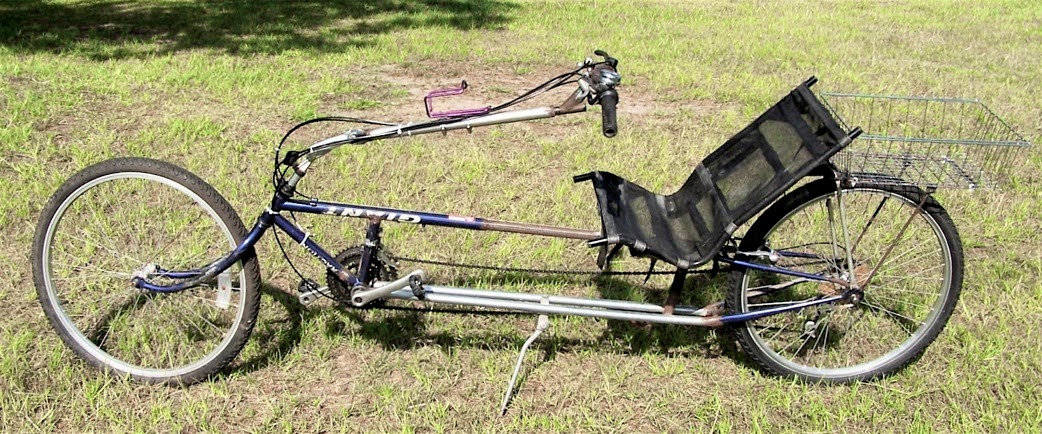
I measured in various directions ... stood it on the floor and looked at it ... and decided that I'd go with it. So welded it up, put the seat on, and sat down. Now I need tie-rods and steering. Maybe I'll get those done on Saturday or next week.

It is looking so much like it's "for real" that it makes me want to finish it to a functional point, and take a ride.

Tuesday, November 24, 2009

Still Thinking About This ...

At this point I have the steering arms tack-welded onto the main tube. It stands up all by itself. It isn't tack-welded good enough that I would dare sit on it yet. I'm still thinking and measuring to make sure that everything is aligned the way I want it to be. This is kind of a critical point in the project. The success of the handling and steering is dependent upon this one phase being properly assembled. It may take a few days before I go on from here.

Here's looking from the rear towards the front.

The opposite view - front to rear.

I stood on a box to shoot this downward diagonal foto.

Monday, November 9, 2009

Drive Wheel Clearance

This fork was made according to plans. But the plans didn't take into consideration putting a wheel in there with a drive-ring on it for a GEBE engine. I thought I had about 1/4" clearance, but it turns out that I only have 3/16" clearance between the drive-ring and the fork. So, it is workable ... provided nothing goes wrong. I think that next time I will make the front end of the fork about an inch wider than called for in the plans. That would give an extra 1/2" on each side.

Maybe that is too much. Perhaps only 1/2" wider at the front ... giving an extra 1/4" on each side. ( 1/4 + 3/16 = 7/16") That sounds better now that I think about it ... don't want to make it too wide if you are mounting a "V"-brake on the rear wheel (what with posts and all that).

Wednesday, November 4, 2009

Steer Arm

Here it is with all those things stuck together.
Wheel attached to steering arm. ...
The left end of that arm has to be attached to the main tube.
That will be a compound mitre thing to tear hair over.
After I make the seat ... or something like that.
:-p

The most Traumatic so far ...

You have to weld the headset part to the mounting tab ... and you're supposed to get the angle just right by visual, a straight-edge, and a prayer. Because you are gestimating that everything is lined up properly while you hold your thumb at arms length and go "uuhhh-yup!"

Anyway, after welding the hole closed and filling in any other gaps ... it looks somewhat like this ... in desperate need of the grinder. That poor grinder wheel is just about worn down to a tiny nub. I'm going to have to buy another one soon.

This is what it looks like after grinding.
I agree. Nothing that some bondo and covering it up with paint won't fix.